Saturday 28 November 2015

Name Bunting

The autumn is always busy at ElleAyJay Towers, not least because I suddenly realise how many birthday and Christmas presents there are to make and how little time I have. This year is no exception, not helped by also trying to give the bathroom a revamp.

My very good friend has two little boys and, as each arrived, I made them bunting that spelled out their name. In each case, the end product was very well received and so I decided that 'Mum' should get to have her name in bunting too. So, with her birthday rapidly approaching I finally sat down to the project, managing to sew each letter between spraying coats of paint on the bathroom towel rail.

I have no idea what the individual elements on a string of bunting are officially called but here I'm going to call them 'flags'. In this version, each flag is made from two pieces of fabric, each measuring 12cm by 9cm. You will need a pair of fabric rectangles for each letter, preferably a plain fabric; and a pair for each end, preferably a patterned fabric.


For the letters I used the computer, dividing an A4 sheet into quarters and typed out my friend's name with one letter in each quarter of the page, adjusting the size of the letters until it looked about right. Once printed out I traced the letters back-to-front onto some bondaweb and then cut each letter out roughly.


These were then ironed onto felt before being cut out following the traced lines of each letter.


I carefully peeled the paper backing from each bondawebed letter and lined each letter onto a piece of the cut plain fabric flags.  Each letter was set slightly lower than centre since I knew I was going to lose a bit of the top when I sewed it onto the ribbon.


The next bit is rather a of a labour of love and what occupied me between coats of radiator paint. If you've seen a previous post featuring an appliquéd blanket, you may know I have a bit of a soft spot for blanket stitch. Bondaweb is a great invention but the heat-activated glue can fail over time so adding something more permanent is always recommended. In this case I chose to use tiny blanket stitches using embroidery thread. Well, if I'm honest, I did this for my friend's first son and felt I had to continue the theme for fear of causing sibling rivalry! Anyway, depending on the complexity of the letter this took me between 30 and 45 minutes per letter. However, since this blog is all about the hand made as opposed to the mass-produced, as well as the joy of creating something by hand, it's all part of the process and it was really rather relaxing (not to mention better than watching radiator paint dry!).


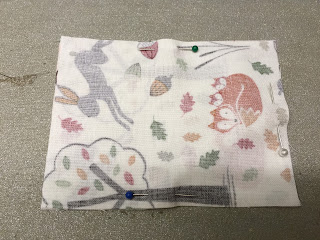
Once all the letters were stitched securely in place, I turned my attention to making each flag by placing each piece of fabric with a letter on it, face to face with a correspondingly coloured but unadorned piece of fabric. I did the same with each pair of pattered pieces of fabric. Using the sewing machine I then sewed around the sides and bottom of each flag leaving as small a seam as I could - about 0.5cm.


I clipped the bottom corners and then turned each flag the right way out, ensuring the corners were as sharp as possible, before pressing flat.


The final step was to sew the flags (in the right order!) onto some bias binding. I first pressed the bias binding in half lengthways and then spaced the flags out before pinning them in place.


A line of stitching the full length of the bias binding was all that was left to do before I could admire my day's work.


Now all I have to do is apply the final coat of paint to the radiator!

Monday 23 November 2015

You don't mind when it's something you enjoy

On Saturday morning I went to a craft fair held at my parents' local garden centre. There were about 40 stalls of local producers ranging from ceramics and jewellery through to a producer of beauty products made from lavender grown in the Mendips, a Somerset cider maker, and even a local vineyard showcasing their first commercial wine (a delicious rosé).

One stall holder made the most intricate beaded jewellery. It wasn't quite to my taste but I could fully appreciate the enormous amount of time that she must spend on her craft, the smallest of which must contain hundreds of beads, and I said as much. The lady did agree but added 'but you don't mind when it's something you enjoy, do you'.

She couldn't be more right in my opinion and I instantly thought of the project that I've been working on for the past six weeks - or is it seven?  Or perhaps it's only four but feels like it has been going on forever (I'm not the most patient of people!) The project is making a set of coasters and placemats for my new dining table. The table was purchased in early October and was finally delivered last week. It will seat 8 cosily so I had begun work on a set of eight placemats and coasters as soon as I had ordered the table, having been thinking about them for some time before.

I had originally thought of making the coasters from denim but my fabric searches had failed to unearth anything that was the right colour or wasn't so rigid that I feared for my sewing machine and the quality of the final product. Alongside my fabric searching I seemed to keep running into conversations or magazine articles or things in shops about needle-felting - a craft that I haven't done for some time. I decided the coincidences of these encounters and the lack of suitable denim was trying to tell me something and so I decided the placemats and coasters should all be needle-felted. The end product would be thick enough to offer great heat resistance and the materials required were either already in the house or easy to find from local craft suppliers

A new kitchen is also being planned - black and white with hints of oak - so I thought I could get rather bold with accessories, including the placemats. I therefore hit on a 'rainbow' theme, making each mat a different colour. I had 5 of the 8 colours already in stock so the financial outlay for the additional colours was minimal (about £3 per colour) plus a 30cm diameter tapestry ring to use as a template for the placemats (also only about £3). What I had forgotten was how long needle-felting takes, particularly large items! What I would save in fabric costs would be made up for in woman-hours. However, as the bead jewellery lady so rightly said yesterday, you don't really mind when it's something you enjoy. I'm also getting to catch up on a lot of radio dramas (bliss!)

So, in amongst the 9-5 job, household chores and errands, even attempting to maintain some sort of social life and not become a wool-stabbing recluse, I have spent the past 6 weeks attempting to turn this...
...to this...


If you are unfamiliar with the process of needle-felting it essentially involves stabbing carded wool with small barbed needle (or four together in a holder as pictured). You need a foam pad to work on that the needle can sink into; and, in the case of the placemats and coasters, some sort of circular template such as a tapestry frame (the placemat) or a cookie cutter (the coaster).  The stages look something like this...

Lay tufts of the carded yarn criss-cross within the template

Stab with your needles

Turn and stab some more

Keep going until the surface is dense and neat

I find that I need to peel the felt off the foam pad and turn it over and needle it from the other side about 4 or 5 times, hence it takes so long to make.

I've only managed to make 6 placemats and 5 coasters so far, but with the added arrival of new dining chairs on Saturday, I couldn't resist testing out the overall look.


Spot the missing coaster!
Now I just have to make the final placemats and coasters. The two missing colours are royal blue and purple.

I'm really pleased with the look so far, the mats giving a real pop of colour to the room. However, I fear they are not very festive so I may need to come up with an alternative for the Christmas table. I'd better get my thinking cap on!

Monday 2 November 2015

Halloween Food Fun

I'm busy making some placemats and coasters but it's turning out to be a lengthy process at a busy time of year. As a result, I'm only about half-way through and am not yet ready to share. However, I took time out from placemat-making this weekend to have some Halloween fun with food.

As a regular reader of the Sainsbury's Magazine I had spotted a tasty-looking themed menu in the October issue so promptly invited some friends over and got cooking.

The menu consisted of baked Camembert with pumpkin dippers and crudités, followed by smoky chipotle chicken one-pot with chunky coriander guacamole, with a spiced treacle and hazelnut tart for dessert.

I had to make a few tweaks in order to cater for everyone but I can't say they had any effect on everyone's enjoyment of the meal.

Firstly I had to make it all gluten-free, which is my excuse for the pumpkin dippers spreading out rather more than expected - still deliciously cheesy and fun, if a little thin and losing their shape!


I then had to substitute the coriander, since it is a pet hate of one of my friends. I chose parsley instead.

As for the treacle tart, as well as being gluten-free it turned out a whole lot more ghostly.  I couldn't lay my hands on the recommended bat cookie cutter for the decorations but think the ghosts look just as fun floating around in the treacle.


OK, so I'm not likely to be picked to take part in the next Great British Bake Off as a result of my efforts (not least because I don't get the impression that the judges do gluten-free very willingly!) However, in my defence, the tart didn't have a soggy bottom and, in spite of some shrinkage at the sides and a little bit of a spillage of the filling, it tasted delicious and my friends were sent home (willingly!) with a doggy bag of treacle tart.

Huge thanks to my friends for being my guinea-pigs and indulging me in my food fun. And, now that it's tried and tested, I'm busy working out what cookie cutters I can use for the same menu on Christmas Eve!