Friday, 1 March 2019

Golden Snitch lampshades


2019 is proving to be a busy and momentous year. Not only did I start a new job in January but I also moved house. Rather unexpectedly, I then moved house again last week. Let’s just say, the year’s events have definitely been keeping me on my toes!
Sadly, this has meant little time to exercise the creative muscles. I’ve even been cooking less. However, I’m hoping things are going to settle down a bit and that I can get creative again.

Mind you, this is not to say that I’ve done nothing. I have a friend who also moved house in January and I was determined to put an idea into practice as housewarming presents for her two young sons. Late last year a friend, who is a primary school teacher, was telling me about a lantern parade she was involved in at school and she was getting all the children in her class to make bird themed lanterns. She then also showed me a very basic paper lampshade that she had decorated for her apartment. Both these projects planted a seed in my head which I have been waiting for an opportunity to try out ever since.

My friend’s sons happen to be Harry Potter fans and so the idea of turning a paper lampshade into a Golden Snitch was born. For those not familiar with the Harry Potter stories, a Golden Snitch is a small flying ball that features in the popular game of Quidditch.  The Golden Snitch is released from a box at the start of the game and it is the role of each team’s Seeker to catch it whilst dodging various obstacles which his or her team mates try to protect them from.

In reality – umm… I mean, in the fictitious world of Harry Potter (!) – a Golden Snitch fits into the palm of your hand but a lampshade this size would be no good to anyone. My Golden Snitches were, therefore somewhat larger. They also involved a considerable amount of planning and engineering, with materials being an important factor in how the lampshades were eventually constructed. To be completely honest, they just gradually evolved!


The main body of the Snitch was always going to be a paper lampshade sprayed gold but the wings went through various thought processes and experiments. Card wings seemed difficult to attach to what is a very flimsy and fragile lampshade so that plan was quickly dismissed, and the plan for pipe cleaners and tissue paper turned out to be just too flimsy. In the end I happened across a wipe clean but disposable table cloth in the partyware section of my local supermarket (I have completely forgotten what I was actually looking for at the time). This proved to be far more robust than the gold tissue paper I had but still had the advantage of allowing movement.

With the pipe cleaners being dismissed as too flimsy, the offer of the core wire from a disused coaxial electrical cable was gratefully accepted. Two lengths were cut for each lampshade paying careful attention to get the right proportion of wing size to body (how did we achieve anything before the arrival of Google Images?) and these were further lengthened with a section of pipe cleaner at each end. The object of the pipe cleaner was to give a little more fluidity to each wing tip and also attempt to reduce its ability to poke out an eye!

A wing shape was cut from the folded tablecloth, with the fold planned for the top edge of the wing.  The wing shape was then opened out and the length of wire and pipe cleaner placed along the inside of the fold with about 10cm of wire sticking out as a sort of feather ‘quill’ to attach to the lampshade and the pipe cleaner making up approximately 10cm at the other end - the feather tip.

The wire was then taped in place using double sided tape. The protective strip was then removed from the second side of the tape and the wing folded around the wire to reveal its final shape. All was left to do was to create the wings’ feathers by snipping along the bottom edge.

How to attach the wings had been exercising me a bit but it was the lampshade structure that gave the solution, courtesy of my residential engineer! Each lampshade comes flat packed with a rectangle of wire to insert to help open it out. Fortunately the top edge of the rectangle of wire has three really handy features. The first is a c-shaped piece of wire in the centre which is where you hang the lampshade on the lighting flex that hangs from the ceiling. The other two features are a small triangle of wire sticking up at the top corners of the rectangle for inserting into two small circles of wire in the top of the lampshade which help anchor the lampshade to the rectangular frame.

The wings were easy to attach by threading each bare ‘quill’ wire through the small triangle on either end of the frame and then hooking the end around the c-shaped piece of wire in the centre. This gave them enough of a foundation to stick out rather than droop down.  There was also no trying to attach wire to the fragile tissue paper lampshade. The ability to slot the wings in and out also meant that the Golden Snitches were much easier to transport – believe me, two large and fragile lampshades are a lot easier to fit in the back of a car if they don’t each have two huge wings sticking out of them!

A completed Golden Snitch
I was rather pleased with the end results and just hope that the Harry Potter fans were equally as delighted.

A Snitch in its new home


Friday, 21 December 2018

Merry Christmas

After a manic few weeks I have finally made and delivered all the presents including one or two jars of chilli jam, some marinaded olives, some spicy nuts, and some incredibly cute (even if I do say so myself!) goldfish mittens.


It just leaves me time to say Merry Christmas to one and all and share an image of this year's Christmas decoration.


Have a wonderful Christmas and a peaceful and prosperous New Year.

Thursday, 13 December 2018

Mega Mince Pie

After getting into the Christmas spirit back in September by making Cranberry Chutney and some mincemeat, I decided it was about time the mincemeat got used. Well, some of it at least. I remember making some mince pies with a frangipane topping a year or so ago so dug out the recipe and got baking.

I decided to follow the recipe to the letter, just substituting normal flour for gluten-free. The pastry had the addition of ground almonds, some icing sugar and the finely grated zest of an orange and seemed to be coming together really well.  Since gluten-free pastry is very fragile - gluten gives pastry and dough a stretchy quality that is entirely lacking without it - I always roll it out between two sheets of clingfilm as this helps to keep it all together and also helps when transferring it into any sort of pie tin or flan case. However, my patience was growing rather thin as I attempted to cut out 9cm discs of this very fragile mixture and line deep mince pie tins with it. I was up against the clock as I had a date with a friend, and things weren't going at all well. I had already scrapped two attempts to line just the first of 12 pie 'holes' and the pastry was in danger of being over worked or even thrown in the bin in frustration.  I therefore took the executive decision to make one giant mince pie rather than the more traditional individual ones. Well, the baking process was supposed to be enjoyable and it was rapidly becoming the opposite. I'm also a firm believer in cooking and baking with love for the people I love and things were feeling rather doomed at this point!

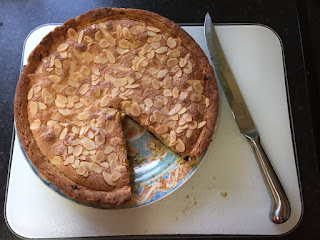
A quick re-roll of the pastry on fresh clingfilm gave me a large circle which I easily lifted into a 23cm flan tin. The rest was simple - spread it with a jar of homemade mincemeat and make up a frangipane mixture to cover it, finishing with a sprinkle of flaked almonds.

The mega mince pie came out of the oven (180C or gas mark 4) about 35-40 minutes later and was bundled straight into the car for the drive to my friend's house. I have to admit that my car has never smelt so good! The pie went down a storm and the addition of the orange zest in the pastry was sheer genius. This is definitely a recipe to be repeated!

For the pastry:
125g plain flour, or gluten-free equivalent
50g ground almonds
75g lightly salted butter, chilled and cubed
25g icing sugar, sifted
Finely grated zest of 1 orange
1 large egg yolk (add a bit of the white if using gluten-free flour)

For the frangipane topping:
100g lightly salted butter, at room temperature
100g caster sugar
1 large egg
100g ground almonds
1 tbsp plain flour (or gluten-free equivalent)
A sprinkling of flaked almonds for the top


Friday, 7 December 2018

A simple luxury

Are you familiar with the BBC Radio 4 programme Desert Island Discs? It has been going for years and the format is that of an interview where guests are asked to choose eight discs or music tracks that they would want to have with them if they were to be castaway on a desert island. They also get to choose a book and a luxury item.

After a week in rural Ireland earlier this Autumn - hardly a desert island I know, but bear with me please - where I lost the only lip salve that I had with me on day two and was unable to find a shop that sold any sort of replacement for another 5 days, I swiftly realised that my desert island luxury would have to be a lifetime supply of lip balm.

I am normally the person that has one in every coat pocket, every bag, as well as one in the car and one by the bed. Whilst on the ferry to Ireland I soon realised that the coat I had taken had no lip salve in the pocket (what do they say about making assumptions?) and it is the one that I had in the car that fell out of my pocket on the second day. It may seem ridiculous but I can't tell you how much I missed being able to give my lips a quick slather.

Anyway, after a couple of successful attempts to make my own body lotion I thought I would turn my hand to making some lip balm. The ingredients seem to be very similar to body lotion so it was just a case of adjusting the ratios and the volume. And if you had the ability to make the one thing you realise you really struggle to live without, then why wouldn't you at least give it a go?

Having had this mini project in mind for some time, I had been setting aside any small pot that I thought would be useful. One had contained lip balm, another was a small glass jar that originally contained an ointment and the rest had contained free samples of various beauty products.


The next task was to measure out the solid elements for the lip balm. This was 14g beeswax pastilles, 14g Shea butter and 7g of cocoa butter. These were melted together in a metal jug placed in a pan of water.


It's the beeswax which keeps the balm solid when the room temperature begins to rise, so this took quite some time to melt, but once I had a liquid I then added 26ml of apricot kernel oil, 6ml of caster oil and a few drops of vitamin E. As these oils were cold they instantly solidified half of the melted wax and butters but about a minute in the warm jug, still in the hot water, soon resulted in a clear runny liquid. Removing the jug from the hot water I quickly added 12 drops of sweet orange essential oil and poured the melted butters and oils into my prepared pots where they swiftly began to solidify.


With this new stock of lip balm and the ability to make more in minutes, I'm hoping I'm never going to be without again and will be all set to be castaway. Now I just need to decide on the eight discs and book I will be taking with me... would it be Philip Pullman's His Dark Materials trilogy or the complete novels of Jane Austin...? Hmmm, lots to think about!


Monday, 5 November 2018

Thrifty decorations

Over the summer I had a bit of a clear out and found piles of felt left over from an old craft project. There were a range of colours but a strangely large amount of brown felt existed. Naturally I began thinking what I could do with it and Christmas sprang to mind, which regular readers won't be surprised to learn, since I do love all things Christmas and often begin making decorations as soon as the tree is down in January - sometimes you just need to strike as and when inspiration occurs!

Anyway, the brown felt was pulled out, along with some scraps of white. The button pot was raided and the ribbon drawer searched. Soon, the raw ingredients for Christmas puddings (of the felt variety) were being assembled.

As you may imagine, cutting out felt circles creates a lot of small off-cuts, however close together you place your circle templates.  A friend spotted the growing pile of tiny bits of felt and suggested I use them as the stuffing. A brilliant idea, so these little beauties really are the epitome of thrift and waste-reduction. I have to admit to buying the green ribbon but everything else came from left-overs.


I have a tradition of sending hand made Christmas tree decorations in place of Christmas Cards and with this year's gift decorations already made, I had thought I was being very organised for 2019. However, my friend reminded me of the Christmas Fair that the local hospice holds at the end of November and so I have bundled up a pile of puddings and passed them on to be sold.

After all, I do have plenty of time to make more for 2019!


Tuesday, 2 October 2018

Finding Joy

I am convinced that happiness is underrated. Or at least in relation to other more material things. Yet, if we were happier I'm sure some of the more material things would become less important. I'm not talking about the basic material needs that enable us to live above the poverty line, but ... oh, I'm probably digging myself a huge hole here...!

Anyway, have you ever stopped and thought what makes you happy? Have you ever consciously decided to then include more of these things in your life? I have to say, it's a lot harder than you would like to think, since so many more hum-drum things seem to constantly get in the way.

What about things that bring you joy? I guess I'd define this as mini happiness, perhaps even a double espresso of happiness - giving you a boost, a tiny lift, a 'hit'? Any idea what this looks like?

Well, Ingrid Fetell Lee has studied joy extensively and I just love what she discovered.


Her talk is under 14 minutes so please watch it if you can find the time. I'm sure it will make you look at things differently, perhaps even help you insert a bit more joy into your life.

I also now know why I prefer round mirrors to square or rectangular ones, why fairy/cup cakes are so much more enticing than a tray bake, why polka dots can seem so much more frivolous than most other patterns, why the cerise cyclamen and orange violas I've just planted in the front garden make me smile, and why I wear dark clothes when I'm feeling down (and probably shouldn't unless I'm determined to wallow!)

Armed with this new knowledge I'm looking forward to a joyful Autumn!


Friday, 21 September 2018

It's beginning to smell a lot like ...

I'm finally enjoying a bit of free time, something that has been in very short supply for at least a year. Mind you, I'm finding my days very easy to fill and not always with the things that have been mounting up on my 'to do' list for longer than I care to remember.

One thing that really wasn't on my 'to do' list was to clear out my freezer. However, last week I read an article about a woman who challenged herself to feed her family for a month from what she already had in her freezer and kitchen cupboards, supplementing it with fresh essentials limited to a budget of £50.

Firstly, I am pretty sure that her freezer is a lot larger than mine, and secondly that her cupboards were fuller than mine. However, it did get me thinking about exactly what was filling the top drawer of my freezer and when I last cooked amaranth or camarague red rice. Anyway, a quick delve into the freezer revealed 2 bags of cranberries and this was followed swiftly by a flick through a few recipe books. Actually, I immediately grabbed Delia's Winter Collection - the one that resulted in a national cranberry shortage in the UK and sure to contain something I could make using cranberries.

The first bag and a half of berries was swiftly turned into Spiced Cranberry Chutney. I was down to my penultimate jar of chutney from last year so it seemed about time I made some more. I tend to make chutney in vast quantities and then get a bit bored working my way through the resulting jars, so vowed I'd make small batches from now on. This recipe resulted in three jars, one of which I instantly gave away, so I'm already on track. The resulting concoction of cranberries, coriander, cloves and orange simmering on the stove created a distinctly autumnal atmosphere (desperately trying not to use the 'c' word here!)

The question was what to do with the remaining cranberries.  However, a few pages on in the recipe book revealed a recipe for Christmas (darn it, I used the 'c' word!) Mincemeat with Cranberries.  It seemed to make a lot of mincemeat and, seeing as I'm opting out of the festivities this year, it seemed a bit excessive. I therefore halved the quantities and merged the volume of cranberries and apple, using whatever I had of each.

Since I absolutely love all things 'festive' and regular readers will know that I begin making 'festive' decorations as early as January, I was rather surprised to realise that I have never made mincemeat before. Incredible when I realised just how easy it was to do (and how pretty). Whilst the chutney was simmering away I threw all the mincemeat ingredients into a bowl to 'mingle' and that's were it stayed for the next 20 hours or so before being popped into the oven, yet again filling the house with the smells of you-know-what.


Mincemeat 'mingling'

Fresh from the oven

A satisfying stack of jars

Now I'm just working out what to do with the amaranth and camarague rice!