Monday, 15 December 2014

Christmas Tree – with added sparkle!

I do like to have a real Christmas tree but, without access to a car, they can be a challenging thing to purchase. In previous years the main criteria for where to buy a tree has been that it had to be close enough to the house for a decent size tree to be carried home. However, the luxury of a car this year meant that I could work a bit more meaningfully on ‘shopping local’.

I had discovered that the Frenchay Christmas Tree Farm on the outskirts of Bristol, was owned by someone I used to go to school with (and his Dad), so that is where I headed. I got a great reception and found a beautiful tree at a really reasonable price (and that was before I was given ‘mates rates’ – thanks Simon!)  Anyway, if a Christmas tree doesn’t already give you a warm glow, supporting a local business who has lovingly hand tended each tree was the icing on the cake – or should I say angel on the top?!

The next step was to decorate the tree. Last year I felt the tree needed a bit more sparkle. Although I love all the decorations, many are handmade from fabric and so are less than shiny. I was therefore inspired watching Kirstie’s Homemade Christmas when she made some glittery baubles – just what I needed.

Fortunately, this weekend was Craft Club so what better way to spend an afternoon with friends than to apply glue and glitter to polystyrene balls, whilst catching up on all the gossip. It was even a task that I thought I could achieve under the influence of a glass of mulled wine! Kirstie insists that the balls are left to dry for 24 hours before applying hairspray (as a final fix for the glitter) so it was great that we were all staying the night (thanks Jo!) to gorge ourselves on home cooked food and perhaps another glass or two of wine.

If you want to have a go at these baubles yourself just get a load of polystyrene balls, some bamboo kebab skewers, some PVA glue and a brush, glitter, hairspray, some loose cover pins, and some ribbon to hang them with. Oh and an upturned box with holes poked in it or florists foam for the skewers to stand in whilst the glue dries.

As for the instructions, I don’t think it could be simpler. Stick the sharp end of the skewer into the polystyrene ball, paint with PVA glue but not so much that it will drip or run (I found this out to my cost!), then mix up your glitter and sprinkle liberally over the gluey ball. Stand the skewer in the box or foam and leave to dry for 24 hours.  Repeat until your run out of balls, glue or glitter! I even made a bauble with all the left-over glitter colours mixed in together, which turned out surprisingly well.


The next day give each ball a liberal coating of hairspray and, once dry, carefully remove the skewer and hide the hole by fixing a ribbon loop to this part of the bauble using a loose cover pin. Kirstie simply fixed the centre of the ribbon to the bauble and tied a bow at the top to hang over the tree branch but I went for the slightly more fiddly option. I crossed and overlapped the ribbon at the bauble end before fixing with the pin and then hid the pin with a simple knot.

Over tea and mince pies the previous day the Crafters had discussed which ribbon looked best with which bauble. I decided to try all options – matching the colours as well as mismatching them. I’ll let you decided which you prefer.


I'm really pleased with the results, which are even more sparkly in real life!

Wednesday, 10 December 2014

Advent Garland

We are well and truly in the countdown to Christmas, and what better way to do this than with an advent calendar. There must be a million versions of this simple tradition, some consist of opening a perforated card 'door' to reveal a picture (or more commonly these days a small chocolate); others are more elaborate involving 24 containers, each bearing a small gift.

Up until last year I was a true traditionalist about this and stuck to the simple illustration with 24 doors. In fact, I still have this in card form as my friend in Germany sends me one of these as a birthday card each year, which I love!

This year's birthday advent calendar

However, inspired by Design Sponge's Falling Stars Advent Calendar I set about creating my own version - making it with felt rather than brown paper so that it could be used for years to come. I started by cutting out 24 different shaped stars from white felt and then made backs for each star by cutting out two overlapping halves. Using silver embroidery thread and a simple chain stitch I sewed numbers to the front of each and then used whip stitch to join the front to the back. Various lengths of narrow silver ribbon for hanging the stars finished each one.

My next challenge was to find a suitable branch to hang all my stars from. Living in the middle of a city with only a small garden, this proved rather difficult. However, I enlisted the help of my Dad who appeared in the last week of November with half a holly tree sticking out of the top of his car (I thought it best not to ask too many questions - he lives in a flat so it certainly didn't come from anything he had readily to hand!) As for things to go in the stars, my lovely friend Ce set about filling them all as my Christmas present. This resulted in a wonderful haul of chocolates, craft accessories, lip balm and jewellery appearing daily throughout December.

2013's advent branch

This year, not wishing to risk having my Dad arrested, I felt I needed to come up with a better solution for hanging the stars. A trip to my local high street resulted in me hauling home a 2.5m festive garland. I say 'hauling' but it did fit into a carrier bag so there was no chance of being pulled over by the Transport Police!


This year the stars are filled with chocolate coins. Not nearly as lavish as last year but certainly a nod to my childhood Christmases.


 The next task is to source a Christmas tree. A job for Friday I think!

Sunday, 7 December 2014

Party Food

It has been a busy few weeks with lots of birthdays to celebrate, including my own, and a few days ago I invited some friends over for an informal gathering. I wanted to serve some simple tapas-style food that involved fresh ingredients and some interesting flavours. It was all very well received (devoured!) and so I thought I’d share some of the recipes with you, in case you have your own party - birthday, Christmas or other - planned.

First up (since everyone asked for the recipe) is a Citrusy Green Quinoa Salad. The secret here is in the dressing. Place about 200g of cooked quinoa in a large bowl (these quantities serve 6-8) and to it add: 75g chopped watercress; 100g chopped fresh spinach; a small, finely chopped onion; 100g toasted, chopped pistachios; 3 tablespoons each of chopped mint and chopped parsley; half a deseeded and diced cucumber; and 1 diced avocado. Mix well. In a separate bowl or jug mix up the following ingredients for the dressing: 1 teaspoon of ground cinnamon; 1 teaspoon of ground ginger; 2 teaspoons of sumac; the juice of a lemon; 3 tablespoons of olive oil; and 2 tablespoons of pomegranate molasses.  Just before serving, mix the dressing into the salad ingredients.


Next come a couple of dips: Red Pepper Hummus and Spicy Broad Bean Dip. Both are so simple I almost feel that they are cheating, but if catering for large numbers I think you are allowed some easy dishes and it’s definitely better than buying a tub of dip from the supermarket. I promise, even if you profess to not being able to cook, you will be able to make these.

For the Red Pepper Hummus simply blend the following ingredients up in your food processor: a 400g tin of chickpeas (drained); a couple of roasted red peppers from a jar (drained); a teaspoon of lime juice; a teaspoon of paprika (or smoked paprika if you prefer); a sprinkling of salt and pepper; tahini paste to taste (optional).  I served this with some falafel but toasted pitta would work just as well.

The Spicy Broad Bean Dip involved a bit more cooking, but not much, but its simplicity does rely on being able to buy a jar of Belazu’s Coriander and Cumin Paste.  If you can’t get this, just look to see what else may be available – coriander pesto, ordinary pesto, sundried tomato pesto all would add great flavour or just add chopped fresh coriander and some ground coriander and cumin until you get a flavour you like.  However, for the simple version, start by finely chopping half an onion (or a shallot) and sauté in a bit of olive oil over a low heat until soft. Meanwhile, cook 250g frozen broad beans in boiling water for about 4 minutes and then drain. If you want, reserve a few of the cooked broad beans to decorate, otherwise tip the cooked beans, onion and garlic into a food processor, add 60g of the Belazu paste (or whatever you’re using as a substitute), a 400g tin of butter beans (drained), 2 tablespoons of lemon juice, and a large handful of mint leaves. Blitz to a paste and tip into a serving dish. Top with the reserved broad beans, popped out of their shells, a sprig of mint and a swirl of olive oil. This I served with crudités.


The next dish was a Pea, Feta and Basil Frittata.  I found this recipe on the Sainsbury’s Magazine Blog – delicious! They serve it with a tomato salsa but because I had so much else going on, including a tomato sauce, I didn’t bother.


I was very lucky to be given River Cottage Veg Everyday book for my birthday so I couldn’t get away without making something from it.  I chose the Chilli, Cheese and Rosemary Polenta with Tomato Sauce.  I know one of my guests is not partial to chillies so I replaced the chilli flakes with a small pinch of mild chilli powder. I think it was enough to add depth of flavour but not so much that she knew it was in there!


Although perhaps not the most feted dish on the table but my own personal favourite for effort put in and enjoyment received, was the Tomato, Mozzarella and Basil Skewers. This is simply cherry tomatoes, mini mozzarella balls and basil leaves threaded onto cocktail skewers. However, the fun bit for me was making the mozzarella. For Christmas last year, friends had given me a cheese-making kit (mozzarella and ricotta).  It contains all you need (except for 8 pints of whole milk and a pair of rubber gloves!) to make both types of cheese. It may initially seem like a bit of a faff but it only takes about an hour and is hugely satisfying. A great present for anyone who likes cooking!


A plate of Parma ham and some sliced Milano salami completed the feast.


Friday, 5 December 2014

Fabric Wall Hangings & the Holiday Project (finally!)

When talking about my new duvet cover the other week, I mentioned that I had bought some other similarly smile-inducing fabric and have it as a wall hanging. What I don't think I mentioned was that I had also mounted an off-cut in an embroidery hoop as a picture.

Earlier in the week I found myself at home in daylight hours so grabbed the camera to take some photos to share. For anyone struggling to grasp what I was on about I'm hoping this blog's photos will result in some 'lightbulb' moments when you can actually see what I was blathering on about.

The fabric hanging is about a metre wide and over 2 metres long and, I think, really cheers up a hard-to-reach and very dull wall on the staircase.


You even get little glimpses as you walk up the stairs thanks to the mirrors on the opposite wall.


And, if you didn't already spot it in photo two, here's the off-cut that I mounted in an embroidery hoop.


I liked this effect so much, I managed to salvage a bee and a bug from duvet cover off-cuts and am in the process of making a further two embroidery hoop pictures. It's really easy - just clamp the fabric in the hoop, trim off the excess fabric, and then place some really strong double-sided tape, preferably as wide as the wooden hoop is deep, to anchor it all in place (although I'm currently out of double-sided tape, hence this is still a work in progress).  However, the finished hoops will hang on the wall adjacent to the blackbird.

The back view - the red shows where the double-sided tape goes.
The (incomplete) pair

There, surely that was easier than me trying to describe the various wall-hangings ... and if a picture speaks a thousand words, I've just saved you reading a extra 6,000 words!

Oh yes, and also taking advantage of being home in daylight (December days in the UK have me leaving for work just as it is getting light and getting home well after sunset - bleurghhh!) here's a quick photo to show you how my holiday project turned out.  I did finish it months ago and it has been much worn!


Monday, 24 November 2014

Summer Bag - farewell

Autumn has definitely arrived and so any journey outside involves a warm and preferably waterproof coat, having an umbrella to hand if not in hand, and occasionally a hat and gloves. This change in wardrobe also, for me, involves a change in bag.

Gone are the carefree days when a bag slung over the shoulder is a practical option. Bulkier clothing invariably means the bag doesn’t really stay on my shoulder and when you then add in wrestling with an umbrella in the elements or removing gloves in order to find door keys I tend to seek something that, once shouldered, stays put.

It is therefore with some sadness that I say farewell to my summer bag and dig out my more muted but practical and hands-free cross-shoulder option. But before it spends the next 5 months in the cupboard I thought it was a good opportunity to share it with you, not least because it is hand made, but also because it also got quite a few compliments this year.


I would love to say that the bag was meticulously designed from the outset, but the reality is the design evolved slowly. It started a number of years ago when a friend returned from a business trip to Tallinn, Estonia with a gift of two balls of rainbow-dyed yarn. It was 100% wool but treated in a very different way from a ‘normal’ ball of wool you’d buy to knit or crochet with. Without getting too technical, not least because I don’t really know any great detail of what happens between shearing the wool off a sheep to buying it in a shop to knit with, this wool was different in a number of ways. Although dyed and carded (a process that disentangles, cleans and intermixes fibers to produce a continuous web or sliver suitable for subsequent processing*), very little else had been done to it. A gentle pull of the yarn, a normal process when knitting or crocheting to unravel a length from the ball to knit with, just resulted in the strands breaking. I occasionally pulled out bits of grass or grass seeds from the strands and my hands were always beautifully soft every time I worked with it indicating that hardly any of the lanolin (natural oils in sheep wool) had been washed out.

Anyway, the volume of wool I had and the huge fragility of the strand led me to one conclusion – it would be perfect for felting or making ‘boiled wool’. This would help deal with its fragile nature but only if I could knit it into a shape first. This I did carefully and whenever a strand broke I resisted tying a knot and just placed the two broken strands side-by-side and kept going. I’m sure this would have just unravelled if the knitted material was the final product but I knew the ‘boiling’ process would hide any loose strands and really ‘knit’ the fabric together. I cast on a random number of stitches and knitted away in stocking stitch (knit a row, purl a row) until I ran out of yarn.

I ended up with a very flimsy and fragile rectangle about 50cm square. It was only then that I thought it may make a bag of some sort but the next step was to felt or boil it. This was a complete act of faith because I tossed it into the washing machine and turned the temperature dial up to 95°C. Fortunately, this resulted in a lovely, rainbow-hued rectangle of boiled wool but with a slightly curled edge on what was the cast-on and cast-off edges – now measuring about 40cm square.


The rest was pretty straightforward. I joined the side seams and then sewed across the bottom corners to give the finished bag a third dimension. I made two strips of cotton into the handles and sewed them onto the wool.  For the inside of the bag I took a piece of fabric that approximately measured the same size as the original piece of boiled wool and joined it at the top with a zip and a second one that was slightly shorter.  I placed the shorter one inside the larger one and sewed up all the side seams before slip stitching into the main bag opening around the zip. This gives the bag three internal compartments as the smaller zipped section essentially divides the main lining into two.


I hope you love it as much as I do. Just don’t ask me to make another, or if you do, don’t expect it to turn out the same!

*With thanks to Wikipedia!

Monday, 17 November 2014

Duvet Cover

I always seem to struggle to find a duvet cover that I like. The last purchase was a desperate one since the existing pillowcases and duvet cover had become threadbare and now another set of pillowcases looks set to follow suit.

Yet again I was inspired by the Lotta Jansdotter book (the one with the apron pattern), which explains how to make a double duvet cover out of conventional width fabric. It seemed straight forward enough so my next challenge was to find some fabric I liked that also wasn’t too expensive, since you need quite a lot! This is where Ikea came to my aid. I’d already fallen for their Evalotta fabric by designer Malin Åkerblom – the background colour suiting the accent colour I have in my hall and landing. With a lot of help from a friend with a tall ladder, great DIY skills and a head for heights I have managed to cover a whole wall on the upper staircase with it. It being one of the first things I see when I venture out of the bedroom each morning, it certainly brings a smile to my face (which the previous bare wall did not!)

I also liked Malin’s Evalena fabric but couldn’t think where it would go in the house. Of course, that was until I decided I could make my own duvet cover. The fabric is heavier than conventional sheeting so I didn’t think it would make a great duvet cover if used for the whole thing so this is when I decided to use it for a key section of the top cover, with other cotton (also from Ikea) for the sides and underside. Lotta's instructions use the fabric running width-ways across the bed, but this wouldn’t work with the Evalena pattern. Also, the instructions assume you are using all the same fabric or at least fabrics that are the same width. Unfortunately Evalena is 150cm wide and the red cotton is only 140cm wide. This meant that I spent some time with pencil and paper trying to work out the best arrangement of strips of red both aesthetically and economically.

Anyway, last weekend I put all the theory into practice – easy in terms of sewing but a bit of a faff trying to find floor space big enough to lay out pieces of fabric to measure over 2 metres square, one of which starts out over 6 metres long. However, it was done in an afternoon and I then finished it off this weekend by turning the small strip of red that I had left over into two pillowcases.


I’m so pleased with the result. I also now won’t have to wait until I exit the bedroom to see the birds to break into a smile – surely you can’t resist smiling at those bees and bugs?!


Monday, 3 November 2014

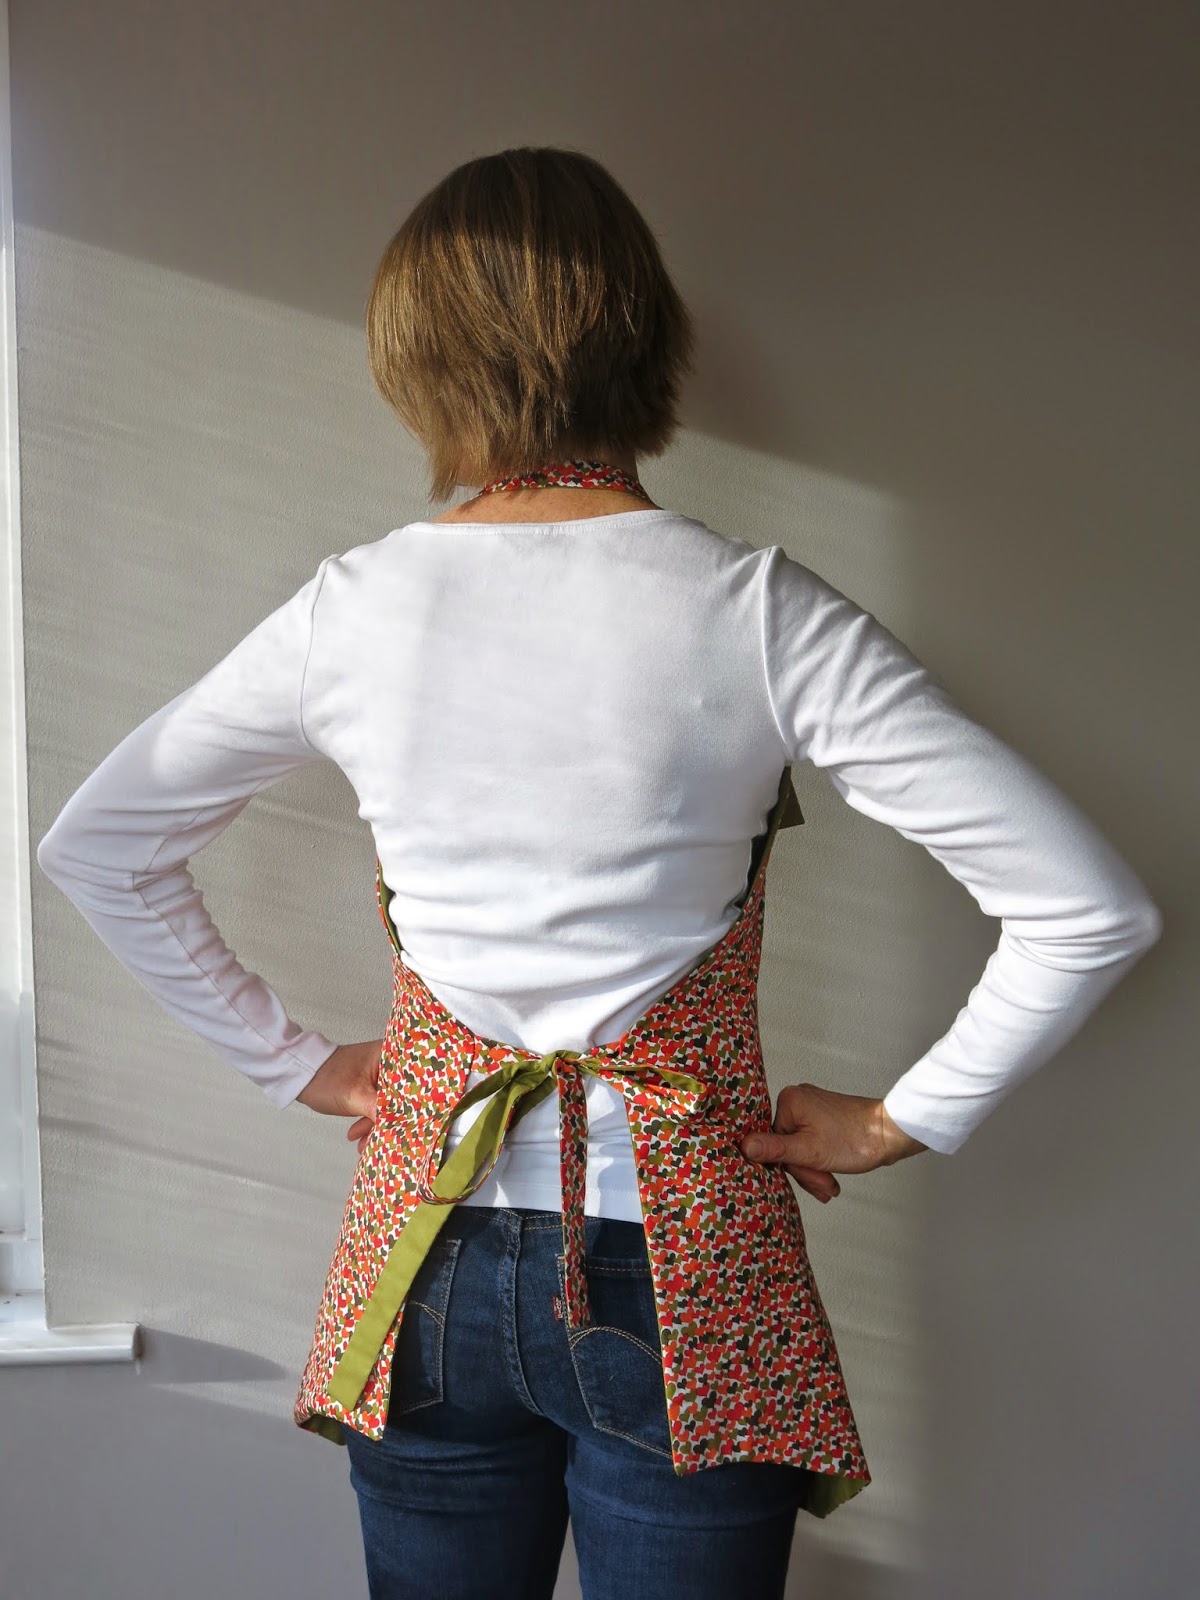
Apron

A few years ago a friend was having a bit of a clear out in order to turn her craft room into a nursery and she passed on a book of sewing patterns by Brooklyn-based Scandinavian designer Lotta Jansdotter. It mostly contains patterns for household accessories such as oven mitts, place mats, a range of bags suitable for carrying anything from books to garden tools to a yoga mat, a duvet cover, desk tidy... hopefully you get the general idea.

One of the patterns is for a double-sided or reversible apron which is a really lovely design. That may sound odd for an apron but it is more than just the usual flat shape and ends up being quite flattering (for an apron!) It is fairly short but the addition of curved side panels gives it ample width and a bit of shape that turns it from being ordinary to something that you wouldn’t mind answering the front door wearing. I made one for myself a few years ago out of denim and red and white gingham, which received lots of complements from the craft club ladies. In fact, a few said I looked as if I was dressed for a party!

So, with the birthday of one of the crafty ladies rapidly approaching and a metre of fabric sitting in my fabric box that I knew she’d like, I set about making her an apron. Lotta’s pattern includes an applique design for a vase and flower but I used one of my own from the butterfly blanket.

Also, the original pattern has two straps at the top that tie at the back of the neck but I find having a knot at this point uncomfortable.  I therefore replaced these with a single strap on one side and a pair of D-rings attached by a short loop of fabric at the other so the neck loop is fully adjustable.


Anyway, huge thanks to Ce my fantastic photographer. Now all I have to do is wrap it up in time for the next weekend’s birthday-themed crafty gathering!